

Do you have a spot in your house that you walk past every day, saying to yourself “You there need a little somethin’ somethin’!”? Me too!
Mine has been the backdoor area where we kick our boots off and it’s really just quite a lacklustre, boring and dark entry. It’s an odd mix of browny gold window frames, drab weatherboards, green painted decking boards and steps covered in orange tile…quite the 80’s combination! So whilst we’re not focusing on updating the exterior of the house just yet, I wanted to brighten up the area and give it some life.
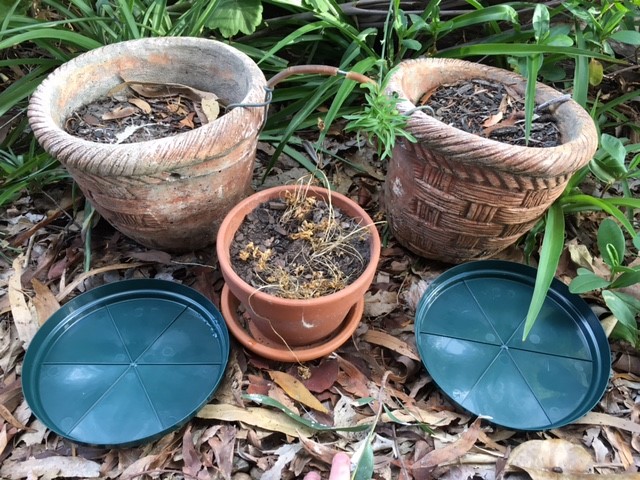
We had some old terracotta pots laying in the garden with dead plants of some description that were called upon to undergo a DIY makeover and brighten up the space.
Now, I’m no painting expert and quite the brown-thumb to be honest, but here is how I turned these drab pots into a little ray of sunshine.
Step one – Prepare your surface
As the two larger pots had been sitting outside in the elements for who knows how long (they were already here when we moved in) they had quite the build-up of dirt and moss. Start by washing inside and out with Sugar Soap and water, ensuring to remove all dirt.
As terracotta/clay is very porous, let them dry for 24-48 hours before doing anything else.

Step two – Seal / Waterproof
As mentioned above, if you’re using terracotta pots, you’ll want to seal both the inside and outside to stop water seeping through and ruining their new paint job. I used Zinsser B-I-N (as that’s what I had on hand) which is a shellac based product sealing, priming and blocking stains (water in this instance) and can be used under any type of paint. Winner! For extra porous surfaces, it’s advisable to apply two coats. This product is great as it’s touch dry in only 15 minutes and you can apply the second coat after 45 minutes.

Step three – Give them new life!
Now is the fun part. It’s time for paint and a fresh new look for these beauties. I used British Paints Spray Easy Paint & Prime in White Gloss applying in multiple light coats. If you’re using spray paint a couple of extra tips here:
- Ensure you’re in a well-ventilated area (outside is best) and cover any surrounding surfaces with a drop sheet or newspaper to save them from over spray.
- It’s best to apply a few light coats rather than going to town with a really thick coat which might result in the paint running and dripping.
You could use any type of paint from chalk paint, acrylic, textured stone look paint. The list is endless. My only tip here is choose something that isn’t water based.

P.S – I would advise not spray painting plastic as it doesn’t stick all that well! But for the purpose of this project and using what we had, they’re just to stop the water dripping onto wood.
Step four – Seal your work of art
To preserve their new paint job, give them a couple of coats with a clear top coat of some sort to keep them looking fresh for longer. I used Boyle Gloss Spray which is an oil based finishing sealer product and it also comes in a matte finish if that’s the look you’re after. Dulux Duramax Acrylic Gloss Clear Coat would be another good option.


I added some twine to finish off the smaller pot, stuck in place with a few squirts from the hot glue gun.

And that’s it. Your pots are now ready for their second life. So here’s the before and after shot of that area I mentioned at the start that needed that little somethin’ somethin’…

Happy painting 🙂

